![[Updated] In 2024, Paper Trail Windows 10/8/7 Snapshot Techniques](https://thmb.techidaily.com/7ba02d2067d54837e1bd869f645984fb69141a6a34b2694ff1529f9b0220b04e.jpg)
"[Updated] In 2024, Paper Trail Windows 10/8/7 Snapshot Techniques"
Paper Trail: Windows 10/8/7 Snapshot Techniques
How to Take Screenshots on Windows [5 Methods]

Max Wales
Mar 27, 2024• Proven solutions
Capturing a still image of your computer’s screen can help you explain a problem with software you’re encountering to the tech support or create a funny image that is going to make your friends on social media laugh. Screenshots can be used for many different purposes, and creating a still image of a Mac or PC’s screen is a straightforward process that takes only a few seconds. Besides, saving photos from videos is also a huge demand.
In this article, we are going to show you five different ways of creating screenshots on Windows 7,8 and 10 and we are going to take you through each method step by step. Let’s get started.

![]()

The All-in-One Screen Recorder & Video Editor
- Record desktop screen, voiceover, and webcam simultaneously
- Edit recorded clips quickly with a wide range of professional tools
- Built-in plentiful templates and effects
- Export to MP4, MOV, MKV, GIF and multiple formats
For Win 7 or later (64-bit)
For macOS 10.12 or later

 Secure Download
Method 1: Using the Screen Sketch App to Take Screenshots on Windows 10
The latest Windows update brings the Screen Sketch app, that was previously available with the Windows Ink utility. PC owners that have the build 17661 of Windows 10 installed on their computers can use the app to create screenshots, draw on screen or crop the screenshots they produce with Screen Sketch. The app also lets you share the images from the clipboard and it replaces all other methods of making screenshots on Windows 10’s 17661 build. Here’s how you can create screenshots with this app.
Step 1. Taking a Screen Shot with Screen Sketch
You can either double-click on the app’s desktop icon or you can launch it from the Windows Start menu. When the app opens, you’ll be able to see all of the software tools in its main window. Click on the New Snipping icon, in the Screen Sketch’s ribbon, and proceed to designate the area of the screen you’d like to capture.

The Windows Key + Shift + S keyboard shortcut can also be used to activate the Screen Sketch’s screen capturing features. The New Snipping feature will grant you access to the Free Form and Full-Screen icons, and you can select them by clicking on their icons at the top of the screen.

The Free Form option lets you create a screenshot in any shape you want, while the Full-Screen feature automatically captures the entire screen. The image you create will be saved on your hard-drive, and if you want to edit it, you’ll have to import the file into Screen Sketch.
Step 2. Editing the Screenshot
After taking a screenshot you will get a notification in the Windows Action Center, click on the notification and then click on the screenshot to open it in the Screen Sketch app.


You can add annotations to the screenshots, by clicking on the bullet point pen, pencil or highlighter icons. The Ruler tool can assist you when drawing straight and curved lines, while the Eraser and Crop tools should be used to remove all unwanted elements in your screenshots.

Step 3. Saving and Exporting Screenshots
Click on the Save icon, in the app’s toolbar ribbon, and select the destination where the file will be stored. You can also copy the screenshot to the clipboard, by clicking on the icon located next to the Save option.

The Share feature enables you to post the picture on social media or send it via email. PC owners who don’t have the latest Windows update can use the Snipping Tool or some other method of creating a screenshot.
Method 2: Capturing Screenshots with Keyboard Shortcuts in Game Bar
All versions of Windows 10 feature the Xbox app that offers the DVR support and it lets its users capture live gameplay or take screenshots of games that are compatible with the Windows 10 OS. Open the Xbox app and head over to the Settings menu and click on the Game DVR option. Make sure that the Take screenshots using Game DVR feature is on, and then press the Windows + G keys to open the Game Bar. The app also lets you customize your own keyboard shortcut if you want to change the default one.
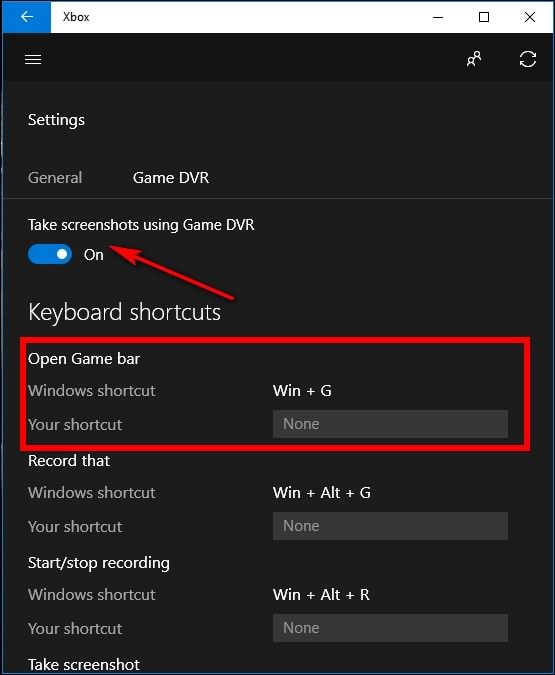
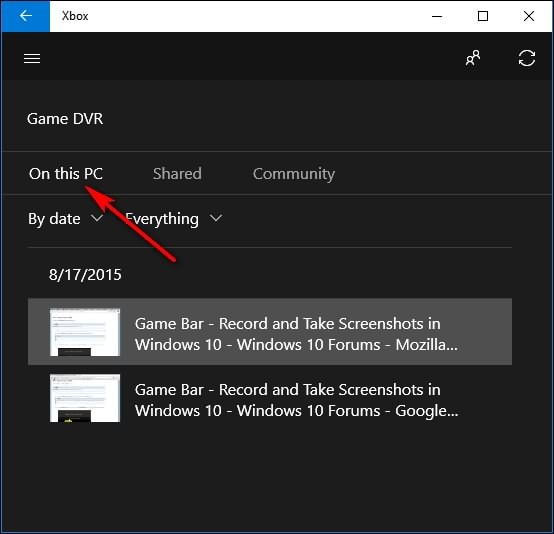
Select the ‘Yes, this is a game’ option if a dialogue box pops-up on the screen and click on the Camera icon or hold the Windows, Alt and PrintScreen keys to take a screenshot. A Screenshot Saved notification will appear on the screen and you should click on in order to access the picture you’ve just taken using the Xbox app. The file will be displayed in the Game DVR> On This PC menu. The Game Bar saves screenshots in the PNG file format and it stores them in C:\Users\[your username]\Videos\Captures.
Method 3: Using the Snipping Tool to Take Flexible Screenshots
This popular app for taking screenshots has been bundled with all versions of the Windows OS since Windows Vista has been released in 2006, which means that PC owners who have Windows 7,8 or 10 installed on their device can use it to take screenshots. For nearly a decade The Snipping Tool has offered the same set of tools, but recently the Delay option that allows you to select how long the software should wait before taking the screenshot was added to the list of the app’s features.


However, this option is only available on the Windows 10 version of the app, and it is a great improvement since it enables you to include mouse cursor and drop-down menus in your screenshots.
Step 1: Snapping a Screenshot with Snipping Tool
You can launch the app from the Start menu or by typing its name in the Search Charm. When the Snipping Tool window appears on the screen you can click on the New drop-down menu and choose from, Free Form, Rectangular, Window and Full-Screen snip options. Simply click on the option that best meets your demands.

Afterward, you can just hold the left mouse button and drag the mouse to select the portion of the screen you’d like to capture. When ready to take the snapshot release the mouse key and wait for the app to display the image.
Step 2: Annotating and Saving the Screenshots
Once you’ve taken the screenshot you can use the Pen and Highlighter features to add annotations, while the Eraser tool will enable you to easily correct all mistakes you make during this process.
The app lets you Save the screenshot in PNG, JPEG, GIF or MHTML file formats and it also lets you email the pictures to your friends and colleagues. You can choose the folder where the file will be saved, and if you are not happy with the result you can click on the New icon to take another screenshot.
Method 4: Using the Share Charm to Take Screenshots on Windows 8.1
Charms were first introduced on Windows 8, but trying to snap a screenshot with the Share Charm on this version of the OS won’t produce any results since the screenshot option is only available on the Windows 8.1. You can access the Charms Bar that offers Search, Share, Start, Devices and Settings charms by either pressing the Windows+C keys or by moving the mouse cursor down from the upper right corner of the screen.
The Share Charm on Windows 8.1 enables you to share links, music, videos, photos or files from the Sky Dive, but it works only with the apps downloaded from the Windows Store. If you would like to share the screenshot on Facebook or any other social media network you will have to install the app on your PC in order to be able to accomplish this task.
Step 1 - Taking Screenshots with the Share Charm
Hold the Window + C keys or use the mouse to access the Charms Bar and then click on the Share option. The feature lets you share files through email, and you can also use it to take screenshots within the apps you downloaded from the Windows Store. For the purpose of this article, we chose to show you how you can take screenshots from the Video app.

Find the moment in the video you’d like to capture, and then select the Screenshot option from the Video app’s menu. The screenshot will be automatically created, and afterward, you should open the Mail application if want to send it. Enter the email address and click on the Send button to complete the process.
The Share Charm offers a quick and easy way to take screenshots, but it lacks the tools for editing the images you create. However, it still provides powerful sharing options that enable you to send screenshots and other media files without having to invest too much time.
Method 5: Take a Quick Screenshots with Print Screen
Nearly all desktop and laptop PCs have a PrintScreen button on their keyboards, but the process of taking a screenshot may vary depending on the model you have. When creating a screenshot on a laptop you have to hold the Function (Fn) key with the Print Screen button that is usually labeled PrtScn or PrntScrn. All screenshots you take will be saved in the Screenshots sub-folder located in the Pictures folder in This PC. Furthermore, you can capture the full screen or only a portion of it and you can either copy or save the screenshot by using this keyboard shortcut.
Saving a Screenshot as a File
The desktop PC owners can press the Windows and PrintScreen button to take and save a screenshot. If you are trying to use the method of snapping and saving a screenshot on a laptop you should hold the Windows Control and PrtScn keys or Windows, Function, and PrtScrn keys depending on the model you are using. Check the computer’s manual to find out which keyboard shortcut works on your laptop, and head over to the Screenshots folder if you would like to edit the picture or upload it online.
Taking a Screenshot without saving it to a hard drive
Hitting the PrtScn button on a desktop computer will copy the screenshot of your screen to the clipboard. Open a photo editing software or a word processor and go to the Edit menu, and then select the Paste option. The Ctrl+V shortcut can also be used to paste the screenshot into a document or any other software that supports image files.
Laptop owners will have to use the Alt, Fn, PrtScn combination of keyboard keys to copy the screenshots to the clipboard. The rest of this process is identical on desktop and laptop PCs.
Snapping a Snapshot of a single window
Make sure that the window you want to capture is selected and then hold the Alt and PrtScn buttons at the same time. This action will copy the screenshot to the clipboard so you can proceed to paste in your favorite photo editor. Holding the Alt, Fn and PrtScn keys will enable you to take a snapshot of one window on most laptops.
Choosing the Region of the Screen You Want to Capture
Choosing which area of the screen you will include in your screenshot is only possible on the Windows 10’s Creator Update. After pressing the Windows, Shift and S keys, your screen will become grayed, and you can just left-click and drag the mouse cursor to designate the region of the screen you’d like to capture. Once you are ready, let go of the left mouse button and the screenshot will be copied to the clipboard. Open a document or a software and paste the screenshot you’ve created using the Ctrl+V keys.
Bonus: How to Take Screenshots on a Windows Tablet
All tablets offer a variety of ways to capture screenshots effortlessly. The quickest and easiest way to accomplish this is to use the hardware keys on your tablet, since other methods of taking screenshots on tablets may require you to invest more time and effort. Simply hold the Windows and Volume Down buttons and the device will take a screenshot that will be saved in the Screenshots folder, located in Pictures library. If you want to edit the screenshot you created on your tablet, you can use a photo editing app that enables you to crop the image or annotate the screenshot.
Conclusion
Taking screenshots on Windows 7,8 or 10 is a fun process that doesn’t require you to be a tech geek. Each method of creating screenshots we described in this article is equally effective, so anyone can choose the one they find the most convenient. Using Screen Sketch or Snipping Tool is the best option for PC owners who want to add annotations to their screenshots, while the PrtScrn button method is by far the quickest way to create a still image of a computer screen.
Leave a comment and let us know what is your favorite method of taking screenshots on PCs.
Max Wales
Max Wales is a writer and a lover of all things video.
Follow @Max Wales
Max Wales
Mar 27, 2024• Proven solutions
Capturing a still image of your computer’s screen can help you explain a problem with software you’re encountering to the tech support or create a funny image that is going to make your friends on social media laugh. Screenshots can be used for many different purposes, and creating a still image of a Mac or PC’s screen is a straightforward process that takes only a few seconds. Besides, saving photos from videos is also a huge demand.
In this article, we are going to show you five different ways of creating screenshots on Windows 7,8 and 10 and we are going to take you through each method step by step. Let’s get started.
![]()
The All-in-One Screen Recorder & Video Editor
- Record desktop screen, voiceover, and webcam simultaneously
- Edit recorded clips quickly with a wide range of professional tools
- Built-in plentiful templates and effects
- Export to MP4, MOV, MKV, GIF and multiple formats
For Win 7 or later (64-bit)
For macOS 10.12 or later
Secure Download
Method 1: Using the Screen Sketch App to Take Screenshots on Windows 10
The latest Windows update brings the Screen Sketch app, that was previously available with the Windows Ink utility. PC owners that have the build 17661 of Windows 10 installed on their computers can use the app to create screenshots, draw on screen or crop the screenshots they produce with Screen Sketch. The app also lets you share the images from the clipboard and it replaces all other methods of making screenshots on Windows 10’s 17661 build. Here’s how you can create screenshots with this app.
Step 1. Taking a Screen Shot with Screen Sketch
You can either double-click on the app’s desktop icon or you can launch it from the Windows Start menu. When the app opens, you’ll be able to see all of the software tools in its main window. Click on the New Snipping icon, in the Screen Sketch’s ribbon, and proceed to designate the area of the screen you’d like to capture.
The Windows Key + Shift + S keyboard shortcut can also be used to activate the Screen Sketch’s screen capturing features. The New Snipping feature will grant you access to the Free Form and Full-Screen icons, and you can select them by clicking on their icons at the top of the screen.
The Free Form option lets you create a screenshot in any shape you want, while the Full-Screen feature automatically captures the entire screen. The image you create will be saved on your hard-drive, and if you want to edit it, you’ll have to import the file into Screen Sketch.
Step 2. Editing the Screenshot
After taking a screenshot you will get a notification in the Windows Action Center, click on the notification and then click on the screenshot to open it in the Screen Sketch app.
You can add annotations to the screenshots, by clicking on the bullet point pen, pencil or highlighter icons. The Ruler tool can assist you when drawing straight and curved lines, while the Eraser and Crop tools should be used to remove all unwanted elements in your screenshots.
Step 3. Saving and Exporting Screenshots
Click on the Save icon, in the app’s toolbar ribbon, and select the destination where the file will be stored. You can also copy the screenshot to the clipboard, by clicking on the icon located next to the Save option.

The Share feature enables you to post the picture on social media or send it via email. PC owners who don’t have the latest Windows update can use the Snipping Tool or some other method of creating a screenshot.
Method 2: Capturing Screenshots with Keyboard Shortcuts in Game Bar
All versions of Windows 10 feature the Xbox app that offers the DVR support and it lets its users capture live gameplay or take screenshots of games that are compatible with the Windows 10 OS. Open the Xbox app and head over to the Settings menu and click on the Game DVR option. Make sure that the Take screenshots using Game DVR feature is on, and then press the Windows + G keys to open the Game Bar. The app also lets you customize your own keyboard shortcut if you want to change the default one.

Select the ‘Yes, this is a game’ option if a dialogue box pops-up on the screen and click on the Camera icon or hold the Windows, Alt and PrintScreen keys to take a screenshot. A Screenshot Saved notification will appear on the screen and you should click on in order to access the picture you’ve just taken using the Xbox app. The file will be displayed in the Game DVR> On This PC menu. The Game Bar saves screenshots in the PNG file format and it stores them in C:\Users\[your username]\Videos\Captures.
Method 3: Using the Snipping Tool to Take Flexible Screenshots
This popular app for taking screenshots has been bundled with all versions of the Windows OS since Windows Vista has been released in 2006, which means that PC owners who have Windows 7,8 or 10 installed on their device can use it to take screenshots. For nearly a decade The Snipping Tool has offered the same set of tools, but recently the Delay option that allows you to select how long the software should wait before taking the screenshot was added to the list of the app’s features.
However, this option is only available on the Windows 10 version of the app, and it is a great improvement since it enables you to include mouse cursor and drop-down menus in your screenshots.
Step 1: Snapping a Screenshot with Snipping Tool
You can launch the app from the Start menu or by typing its name in the Search Charm. When the Snipping Tool window appears on the screen you can click on the New drop-down menu and choose from, Free Form, Rectangular, Window and Full-Screen snip options. Simply click on the option that best meets your demands.

Afterward, you can just hold the left mouse button and drag the mouse to select the portion of the screen you’d like to capture. When ready to take the snapshot release the mouse key and wait for the app to display the image.
Step 2: Annotating and Saving the Screenshots
Once you’ve taken the screenshot you can use the Pen and Highlighter features to add annotations, while the Eraser tool will enable you to easily correct all mistakes you make during this process.
The app lets you Save the screenshot in PNG, JPEG, GIF or MHTML file formats and it also lets you email the pictures to your friends and colleagues. You can choose the folder where the file will be saved, and if you are not happy with the result you can click on the New icon to take another screenshot.
Method 4: Using the Share Charm to Take Screenshots on Windows 8.1
Charms were first introduced on Windows 8, but trying to snap a screenshot with the Share Charm on this version of the OS won’t produce any results since the screenshot option is only available on the Windows 8.1. You can access the Charms Bar that offers Search, Share, Start, Devices and Settings charms by either pressing the Windows+C keys or by moving the mouse cursor down from the upper right corner of the screen.
The Share Charm on Windows 8.1 enables you to share links, music, videos, photos or files from the Sky Dive, but it works only with the apps downloaded from the Windows Store. If you would like to share the screenshot on Facebook or any other social media network you will have to install the app on your PC in order to be able to accomplish this task.
Step 1 - Taking Screenshots with the Share Charm
Hold the Window + C keys or use the mouse to access the Charms Bar and then click on the Share option. The feature lets you share files through email, and you can also use it to take screenshots within the apps you downloaded from the Windows Store. For the purpose of this article, we chose to show you how you can take screenshots from the Video app.
Find the moment in the video you’d like to capture, and then select the Screenshot option from the Video app’s menu. The screenshot will be automatically created, and afterward, you should open the Mail application if want to send it. Enter the email address and click on the Send button to complete the process.
The Share Charm offers a quick and easy way to take screenshots, but it lacks the tools for editing the images you create. However, it still provides powerful sharing options that enable you to send screenshots and other media files without having to invest too much time.

Method 5: Take a Quick Screenshots with Print Screen
Nearly all desktop and laptop PCs have a PrintScreen button on their keyboards, but the process of taking a screenshot may vary depending on the model you have. When creating a screenshot on a laptop you have to hold the Function (Fn) key with the Print Screen button that is usually labeled PrtScn or PrntScrn. All screenshots you take will be saved in the Screenshots sub-folder located in the Pictures folder in This PC. Furthermore, you can capture the full screen or only a portion of it and you can either copy or save the screenshot by using this keyboard shortcut.
Saving a Screenshot as a File
The desktop PC owners can press the Windows and PrintScreen button to take and save a screenshot. If you are trying to use the method of snapping and saving a screenshot on a laptop you should hold the Windows Control and PrtScn keys or Windows, Function, and PrtScrn keys depending on the model you are using. Check the computer’s manual to find out which keyboard shortcut works on your laptop, and head over to the Screenshots folder if you would like to edit the picture or upload it online.
Taking a Screenshot without saving it to a hard drive
Hitting the PrtScn button on a desktop computer will copy the screenshot of your screen to the clipboard. Open a photo editing software or a word processor and go to the Edit menu, and then select the Paste option. The Ctrl+V shortcut can also be used to paste the screenshot into a document or any other software that supports image files.
Laptop owners will have to use the Alt, Fn, PrtScn combination of keyboard keys to copy the screenshots to the clipboard. The rest of this process is identical on desktop and laptop PCs.
Snapping a Snapshot of a single window
Make sure that the window you want to capture is selected and then hold the Alt and PrtScn buttons at the same time. This action will copy the screenshot to the clipboard so you can proceed to paste in your favorite photo editor. Holding the Alt, Fn and PrtScn keys will enable you to take a snapshot of one window on most laptops.
Choosing the Region of the Screen You Want to Capture
Choosing which area of the screen you will include in your screenshot is only possible on the Windows 10’s Creator Update. After pressing the Windows, Shift and S keys, your screen will become grayed, and you can just left-click and drag the mouse cursor to designate the region of the screen you’d like to capture. Once you are ready, let go of the left mouse button and the screenshot will be copied to the clipboard. Open a document or a software and paste the screenshot you’ve created using the Ctrl+V keys.
Bonus: How to Take Screenshots on a Windows Tablet
All tablets offer a variety of ways to capture screenshots effortlessly. The quickest and easiest way to accomplish this is to use the hardware keys on your tablet, since other methods of taking screenshots on tablets may require you to invest more time and effort. Simply hold the Windows and Volume Down buttons and the device will take a screenshot that will be saved in the Screenshots folder, located in Pictures library. If you want to edit the screenshot you created on your tablet, you can use a photo editing app that enables you to crop the image or annotate the screenshot.
Conclusion
Taking screenshots on Windows 7,8 or 10 is a fun process that doesn’t require you to be a tech geek. Each method of creating screenshots we described in this article is equally effective, so anyone can choose the one they find the most convenient. Using Screen Sketch or Snipping Tool is the best option for PC owners who want to add annotations to their screenshots, while the PrtScrn button method is by far the quickest way to create a still image of a computer screen.
Leave a comment and let us know what is your favorite method of taking screenshots on PCs.
Max Wales
 is a writer and a lover of all things video.
Follow @Max Wales
Max Wales
Mar 27, 2024• Proven solutions
Capturing a still image of your computer’s screen can help you explain a problem with software you’re encountering to the tech support or create a funny image that is going to make your friends on social media laugh. Screenshots can be used for many different purposes, and creating a still image of a Mac or PC’s screen is a straightforward process that takes only a few seconds. Besides, saving photos from videos is also a huge demand.
In this article, we are going to show you five different ways of creating screenshots on Windows 7,8 and 10 and we are going to take you through each method step by step. Let’s get started.
![]()
The All-in-One Screen Recorder & Video Editor
- Record desktop screen, voiceover, and webcam simultaneously
- Edit recorded clips quickly with a wide range of professional tools
- Built-in plentiful templates and effects
- Export to MP4, MOV, MKV, GIF and multiple formats
For Win 7 or later (64-bit)
For macOS 10.12 or later
Secure Download
Method 1: Using the Screen Sketch App to Take Screenshots on Windows 10
The latest Windows update brings the Screen Sketch app, that was previously available with the Windows Ink utility. PC owners that have the build 17661 of Windows 10 installed on their computers can use the app to create screenshots, draw on screen or crop the screenshots they produce with Screen Sketch. The app also lets you share the images from the clipboard and it replaces all other methods of making screenshots on Windows 10’s 17661 build. Here’s how you can create screenshots with this app.
Step 1. Taking a Screen Shot with Screen Sketch
You can either double-click on the app’s desktop icon or you can launch it from the Windows Start menu. When the app opens, you’ll be able to see all of the software tools in its main window. Click on the New Snipping icon, in the Screen Sketch’s ribbon, and proceed to designate the area of the screen you’d like to capture.
The Windows Key + Shift + S keyboard shortcut can also be used to activate the Screen Sketch’s screen capturing features. The New Snipping feature will grant you access to the Free Form and Full-Screen icons, and you can select them by clicking on their icons at the top of the screen.
 PearlMountain Image Converter
The Free Form option lets you create a screenshot in any shape you want, while the Full-Screen feature automatically captures the entire screen. The image you create will be saved on your hard-drive, and if you want to edit it, you’ll have to import the file into Screen Sketch.
Step 2. Editing the Screenshot
After taking a screenshot you will get a notification in the Windows Action Center, click on the notification and then click on the screenshot to open it in the Screen Sketch app.
You can add annotations to the screenshots, by clicking on the bullet point pen, pencil or highlighter icons. The Ruler tool can assist you when drawing straight and curved lines, while the Eraser and Crop tools should be used to remove all unwanted elements in your screenshots.
Step 3. Saving and Exporting Screenshots
Click on the Save icon, in the app’s toolbar ribbon, and select the destination where the file will be stored. You can also copy the screenshot to the clipboard, by clicking on the icon located next to the Save option.
The Share feature enables you to post the picture on social media or send it via email. PC owners who don’t have the latest Windows update can use the Snipping Tool or some other method of creating a screenshot.
Method 2: Capturing Screenshots with Keyboard Shortcuts in Game Bar
All versions of Windows 10 feature the Xbox app that offers the DVR support and it lets its users capture live gameplay or take screenshots of games that are compatible with the Windows 10 OS. Open the Xbox app and head over to the Settings menu and click on the Game DVR option. Make sure that the Take screenshots using Game DVR feature is on, and then press the Windows + G keys to open the Game Bar. The app also lets you customize your own keyboard shortcut if you want to change the default one.
Select the ‘Yes, this is a game’ option if a dialogue box pops-up on the screen and click on the Camera icon or hold the Windows, Alt and PrintScreen keys to take a screenshot. A Screenshot Saved notification will appear on the screen and you should click on in order to access the picture you’ve just taken using the Xbox app. The file will be displayed in the Game DVR> On This PC menu. The Game Bar saves screenshots in the PNG file format and it stores them in C:\Users\[your username]\Videos\Captures.
Method 3: Using the Snipping Tool to Take Flexible Screenshots
This popular app for taking screenshots has been bundled with all versions of the Windows OS since Windows Vista has been released in 2006, which means that PC owners who have Windows 7,8 or 10 installed on their device can use it to take screenshots. For nearly a decade The Snipping Tool has offered the same set of tools, but recently the Delay option that allows you to select how long the software should wait before taking the screenshot was added to the list of the app’s features.
However, this option is only available on the Windows 10 version of the app, and it is a great improvement since it enables you to include mouse cursor and drop-down menus in your screenshots.
Step 1: Snapping a Screenshot with Snipping Tool
You can launch the app from the Start menu or by typing its name in the Search Charm. When the Snipping Tool window appears on the screen you can click on the New drop-down menu and choose from, Free Form, Rectangular, Window and Full-Screen snip options. Simply click on the option that best meets your demands.
 Easy GIF Animator is a powerful animated GIF editor and the top tool for creating animated pictures, banners, buttons and GIF videos. You get extensive animation editing features, animation effects, unmatched image quality and optimization for the web. No other GIF animation software matches our features and ease of use, that’s why Easy GIF Animator is so popular.
Afterward, you can just hold the left mouse button and drag the mouse to select the portion of the screen you’d like to capture. When ready to take the snapshot release the mouse key and wait for the app to display the image.
Step 2: Annotating and Saving the Screenshots
Once you’ve taken the screenshot you can use the Pen and Highlighter features to add annotations, while the Eraser tool will enable you to easily correct all mistakes you make during this process.
The app lets you Save the screenshot in PNG, JPEG, GIF or MHTML file formats and it also lets you email the pictures to your friends and colleagues. You can choose the folder where the file will be saved, and if you are not happy with the result you can click on the New icon to take another screenshot.
Method 4: Using the Share Charm to Take Screenshots on Windows 8.1
Charms were first introduced on Windows 8, but trying to snap a screenshot with the Share Charm on this version of the OS won’t produce any results since the screenshot option is only available on the Windows 8.1. You can access the Charms Bar that offers Search, Share, Start, Devices and Settings charms by either pressing the Windows+C keys or by moving the mouse cursor down from the upper right corner of the screen.
The Share Charm on Windows 8.1 enables you to share links, music, videos, photos or files from the Sky Dive, but it works only with the apps downloaded from the Windows Store. If you would like to share the screenshot on Facebook or any other social media network you will have to install the app on your PC in order to be able to accomplish this task.
Step 1 - Taking Screenshots with the Share Charm
Hold the Window + C keys or use the mouse to access the Charms Bar and then click on the Share option. The feature lets you share files through email, and you can also use it to take screenshots within the apps you downloaded from the Windows Store. For the purpose of this article, we chose to show you how you can take screenshots from the Video app.
 WonderFox DVD Ripper Pro
Find the moment in the video you’d like to capture, and then select the Screenshot option from the Video app’s menu. The screenshot will be automatically created, and afterward, you should open the Mail application if want to send it. Enter the email address and click on the Send button to complete the process.
The Share Charm offers a quick and easy way to take screenshots, but it lacks the tools for editing the images you create. However, it still provides powerful sharing options that enable you to send screenshots and other media files without having to invest too much time.
Method 5: Take a Quick Screenshots with Print Screen
Nearly all desktop and laptop PCs have a PrintScreen button on their keyboards, but the process of taking a screenshot may vary depending on the model you have. When creating a screenshot on a laptop you have to hold the Function (Fn) key with the Print Screen button that is usually labeled PrtScn or PrntScrn. All screenshots you take will be saved in the Screenshots sub-folder located in the Pictures folder in This PC. Furthermore, you can capture the full screen or only a portion of it and you can either copy or save the screenshot by using this keyboard shortcut.
Saving a Screenshot as a File
The desktop PC owners can press the Windows and PrintScreen button to take and save a screenshot. If you are trying to use the method of snapping and saving a screenshot on a laptop you should hold the Windows Control and PrtScn keys or Windows, Function, and PrtScrn keys depending on the model you are using. Check the computer’s manual to find out which keyboard shortcut works on your laptop, and head over to the Screenshots folder if you would like to edit the picture or upload it online.
Taking a Screenshot without saving it to a hard drive
Hitting the PrtScn button on a desktop computer will copy the screenshot of your screen to the clipboard. Open a photo editing software or a word processor and go to the Edit menu, and then select the Paste option. The Ctrl+V shortcut can also be used to paste the screenshot into a document or any other software that supports image files.
Laptop owners will have to use the Alt, Fn, PrtScn combination of keyboard keys to copy the screenshots to the clipboard. The rest of this process is identical on desktop and laptop PCs.
Snapping a Snapshot of a single window
Make sure that the window you want to capture is selected and then hold the Alt and PrtScn buttons at the same time. This action will copy the screenshot to the clipboard so you can proceed to paste in your favorite photo editor. Holding the Alt, Fn and PrtScn keys will enable you to take a snapshot of one window on most laptops.
Choosing the Region of the Screen You Want to Capture
Choosing which area of the screen you will include in your screenshot is only possible on the Windows 10’s Creator Update. After pressing the Windows, Shift and S keys, your screen will become grayed, and you can just left-click and drag the mouse cursor to designate the region of the screen you’d like to capture. Once you are ready, let go of the left mouse button and the screenshot will be copied to the clipboard. Open a document or a software and paste the screenshot you’ve created using the Ctrl+V keys.
Bonus: How to Take Screenshots on a Windows Tablet
All tablets offer a variety of ways to capture screenshots effortlessly. The quickest and easiest way to accomplish this is to use the hardware keys on your tablet, since other methods of taking screenshots on tablets may require you to invest more time and effort. Simply hold the Windows and Volume Down buttons and the device will take a screenshot that will be saved in the Screenshots folder, located in Pictures library. If you want to edit the screenshot you created on your tablet, you can use a photo editing app that enables you to crop the image or annotate the screenshot.
Conclusion
Taking screenshots on Windows 7,8 or 10 is a fun process that doesn’t require you to be a tech geek. Each method of creating screenshots we described in this article is equally effective, so anyone can choose the one they find the most convenient. Using Screen Sketch or Snipping Tool is the best option for PC owners who want to add annotations to their screenshots, while the PrtScrn button method is by far the quickest way to create a still image of a computer screen.
Leave a comment and let us know what is your favorite method of taking screenshots on PCs.
Max Wales
Max Wales is a writer and a lover of all things video.
Follow @Max Wales
Max Wales
Mar 27, 2024• Proven solutions
Capturing a still image of your computer’s screen can help you explain a problem with software you’re encountering to the tech support or create a funny image that is going to make your friends on social media laugh. Screenshots can be used for many different purposes, and creating a still image of a Mac or PC’s screen is a straightforward process that takes only a few seconds. Besides, saving photos from videos is also a huge demand.
In this article, we are going to show you five different ways of creating screenshots on Windows 7,8 and 10 and we are going to take you through each method step by step. Let’s get started.

![]()
.png) Kanto Player Professional
Kanto Player ProfessionalThe All-in-One Screen Recorder & Video Editor
- Record desktop screen, voiceover, and webcam simultaneously
- Edit recorded clips quickly with a wide range of professional tools
- Built-in plentiful templates and effects
- Export to MP4, MOV, MKV, GIF and multiple formats
For Win 7 or later (64-bit)
For macOS 10.12 or later
Secure Download
Method 1: Using the Screen Sketch App to Take Screenshots on Windows 10
The latest Windows update brings the Screen Sketch app, that was previously available with the Windows Ink utility. PC owners that have the build 17661 of Windows 10 installed on their computers can use the app to create screenshots, draw on screen or crop the screenshots they produce with Screen Sketch. The app also lets you share the images from the clipboard and it replaces all other methods of making screenshots on Windows 10’s 17661 build. Here’s how you can create screenshots with this app.
Step 1. Taking a Screen Shot with Screen Sketch
You can either double-click on the app’s desktop icon or you can launch it from the Windows Start menu. When the app opens, you’ll be able to see all of the software tools in its main window. Click on the New Snipping icon, in the Screen Sketch’s ribbon, and proceed to designate the area of the screen you’d like to capture.
The Windows Key + Shift + S keyboard shortcut can also be used to activate the Screen Sketch’s screen capturing features. The New Snipping feature will grant you access to the Free Form and Full-Screen icons, and you can select them by clicking on their icons at the top of the screen.
The Free Form option lets you create a screenshot in any shape you want, while the Full-Screen feature automatically captures the entire screen. The image you create will be saved on your hard-drive, and if you want to edit it, you’ll have to import the file into Screen Sketch.
Step 2. Editing the Screenshot
After taking a screenshot you will get a notification in the Windows Action Center, click on the notification and then click on the screenshot to open it in the Screen Sketch app.
You can add annotations to the screenshots, by clicking on the bullet point pen, pencil or highlighter icons. The Ruler tool can assist you when drawing straight and curved lines, while the Eraser and Crop tools should be used to remove all unwanted elements in your screenshots.
Step 3. Saving and Exporting Screenshots
Click on the Save icon, in the app’s toolbar ribbon, and select the destination where the file will be stored. You can also copy the screenshot to the clipboard, by clicking on the icon located next to the Save option.
The Share feature enables you to post the picture on social media or send it via email. PC owners who don’t have the latest Windows update can use the Snipping Tool or some other method of creating a screenshot.
Method 2: Capturing Screenshots with Keyboard Shortcuts in Game Bar
All versions of Windows 10 feature the Xbox app that offers the DVR support and it lets its users capture live gameplay or take screenshots of games that are compatible with the Windows 10 OS. Open the Xbox app and head over to the Settings menu and click on the Game DVR option. Make sure that the Take screenshots using Game DVR feature is on, and then press the Windows + G keys to open the Game Bar. The app also lets you customize your own keyboard shortcut if you want to change the default one.
Select the ‘Yes, this is a game’ option if a dialogue box pops-up on the screen and click on the Camera icon or hold the Windows, Alt and PrintScreen keys to take a screenshot. A Screenshot Saved notification will appear on the screen and you should click on in order to access the picture you’ve just taken using the Xbox app. The file will be displayed in the Game DVR> On This PC menu. The Game Bar saves screenshots in the PNG file format and it stores them in C:\Users\[your username]\Videos\Captures.
 PDF application, powered by AI-based OCR, for unified workflows with both digital and scanned documents.
Method 3: Using the Snipping Tool to Take Flexible Screenshots
This popular app for taking screenshots has been bundled with all versions of the Windows OS since Windows Vista has been released in 2006, which means that PC owners who have Windows 7,8 or 10 installed on their device can use it to take screenshots. For nearly a decade The Snipping Tool has offered the same set of tools, but recently the Delay option that allows you to select how long the software should wait before taking the screenshot was added to the list of the app’s features.
 CollageIt Pro
However, this option is only available on the Windows 10 version of the app, and it is a great improvement since it enables you to include mouse cursor and drop-down menus in your screenshots.
Step 1: Snapping a Screenshot with Snipping Tool
You can launch the app from the Start menu or by typing its name in the Search Charm. When the Snipping Tool window appears on the screen you can click on the New drop-down menu and choose from, Free Form, Rectangular, Window and Full-Screen snip options. Simply click on the option that best meets your demands.
Afterward, you can just hold the left mouse button and drag the mouse to select the portion of the screen you’d like to capture. When ready to take the snapshot release the mouse key and wait for the app to display the image.
Step 2: Annotating and Saving the Screenshots
Once you’ve taken the screenshot you can use the Pen and Highlighter features to add annotations, while the Eraser tool will enable you to easily correct all mistakes you make during this process.
The app lets you Save the screenshot in PNG, JPEG, GIF or MHTML file formats and it also lets you email the pictures to your friends and colleagues. You can choose the folder where the file will be saved, and if you are not happy with the result you can click on the New icon to take another screenshot.
 Forex Robotron Gold Package
Method 4: Using the Share Charm to Take Screenshots on Windows 8.1
Charms were first introduced on Windows 8, but trying to snap a screenshot with the Share Charm on this version of the OS won’t produce any results since the screenshot option is only available on the Windows 8.1. You can access the Charms Bar that offers Search, Share, Start, Devices and Settings charms by either pressing the Windows+C keys or by moving the mouse cursor down from the upper right corner of the screen.
The Share Charm on Windows 8.1 enables you to share links, music, videos, photos or files from the Sky Dive, but it works only with the apps downloaded from the Windows Store. If you would like to share the screenshot on Facebook or any other social media network you will have to install the app on your PC in order to be able to accomplish this task.
Step 1 - Taking Screenshots with the Share Charm
Hold the Window + C keys or use the mouse to access the Charms Bar and then click on the Share option. The feature lets you share files through email, and you can also use it to take screenshots within the apps you downloaded from the Windows Store. For the purpose of this article, we chose to show you how you can take screenshots from the Video app.

Find the moment in the video you’d like to capture, and then select the Screenshot option from the Video app’s menu. The screenshot will be automatically created, and afterward, you should open the Mail application if want to send it. Enter the email address and click on the Send button to complete the process.
The Share Charm offers a quick and easy way to take screenshots, but it lacks the tools for editing the images you create. However, it still provides powerful sharing options that enable you to send screenshots and other media files without having to invest too much time.
Method 5: Take a Quick Screenshots with Print Screen
Nearly all desktop and laptop PCs have a PrintScreen button on their keyboards, but the process of taking a screenshot may vary depending on the model you have. When creating a screenshot on a laptop you have to hold the Function (Fn) key with the Print Screen button that is usually labeled PrtScn or PrntScrn. All screenshots you take will be saved in the Screenshots sub-folder located in the Pictures folder in This PC. Furthermore, you can capture the full screen or only a portion of it and you can either copy or save the screenshot by using this keyboard shortcut.
Saving a Screenshot as a File
The desktop PC owners can press the Windows and PrintScreen button to take and save a screenshot. If you are trying to use the method of snapping and saving a screenshot on a laptop you should hold the Windows Control and PrtScn keys or Windows, Function, and PrtScrn keys depending on the model you are using. Check the computer’s manual to find out which keyboard shortcut works on your laptop, and head over to the Screenshots folder if you would like to edit the picture or upload it online.
Taking a Screenshot without saving it to a hard drive
Hitting the PrtScn button on a desktop computer will copy the screenshot of your screen to the clipboard. Open a photo editing software or a word processor and go to the Edit menu, and then select the Paste option. The Ctrl+V shortcut can also be used to paste the screenshot into a document or any other software that supports image files.
Laptop owners will have to use the Alt, Fn, PrtScn combination of keyboard keys to copy the screenshots to the clipboard. The rest of this process is identical on desktop and laptop PCs.
Snapping a Snapshot of a single window
Make sure that the window you want to capture is selected and then hold the Alt and PrtScn buttons at the same time. This action will copy the screenshot to the clipboard so you can proceed to paste in your favorite photo editor. Holding the Alt, Fn and PrtScn keys will enable you to take a snapshot of one window on most laptops.
Choosing the Region of the Screen You Want to Capture
Choosing which area of the screen you will include in your screenshot is only possible on the Windows 10’s Creator Update. After pressing the Windows, Shift and S keys, your screen will become grayed, and you can just left-click and drag the mouse cursor to designate the region of the screen you’d like to capture. Once you are ready, let go of the left mouse button and the screenshot will be copied to the clipboard. Open a document or a software and paste the screenshot you’ve created using the Ctrl+V keys.
Bonus: How to Take Screenshots on a Windows Tablet
All tablets offer a variety of ways to capture screenshots effortlessly. The quickest and easiest way to accomplish this is to use the hardware keys on your tablet, since other methods of taking screenshots on tablets may require you to invest more time and effort. Simply hold the Windows and Volume Down buttons and the device will take a screenshot that will be saved in the Screenshots folder, located in Pictures library. If you want to edit the screenshot you created on your tablet, you can use a photo editing app that enables you to crop the image or annotate the screenshot.
Conclusion
Taking screenshots on Windows 7,8 or 10 is a fun process that doesn’t require you to be a tech geek. Each method of creating screenshots we described in this article is equally effective, so anyone can choose the one they find the most convenient. Using Screen Sketch or Snipping Tool is the best option for PC owners who want to add annotations to their screenshots, while the PrtScrn button method is by far the quickest way to create a still image of a computer screen.
Leave a comment and let us know what is your favorite method of taking screenshots on PCs.
Max Wales
Max Wales is a writer and a lover of all things video.
Follow @Max Wales
- Title: [Updated] In 2024, Paper Trail Windows 10/8/7 Snapshot Techniques
- Author: Jane
- Created at : 2024-07-21 02:44:56
- Updated at : 2024-07-22 02:44:56
- Link: https://screen-activity-recording.techidaily.com/updated-in-2024-paper-trail-windows-1087-snapshot-techniques/
- License: This work is licensed under CC BY-NC-SA 4.0.