
In 2024, Innovative Approaches for Effective Use of Streamlabs OBS
Innovative Approaches for Effective Use of Streamlabs OBS
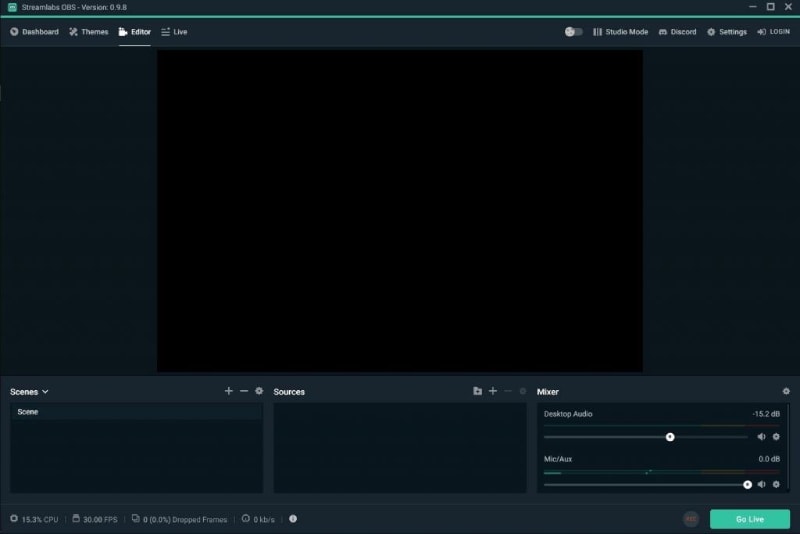
Streamlabs OBS is an active live streaming program for content producers to enable them to broadcast videos on YouTube, Twitch, Facebook, and other platforms of their choosing. An included layout editor and drag & drop feature inside the specific lets customers modify their live streaming platform as per comfort and build a unique UI as well. Moreover, users may record their live stream videos or pick the sources displayed in the live stream. They may quickly store replays of their video or live feeds, allowing visitors to revisit them later. Streamlabs OBS’s simple and user-friendly interface lets viewers Observe recent events and discussions inside a single screen. It may also be used to make bespoke video intros for YouTube and Twitch channels utilizing a selection of pre-made themes currently available.
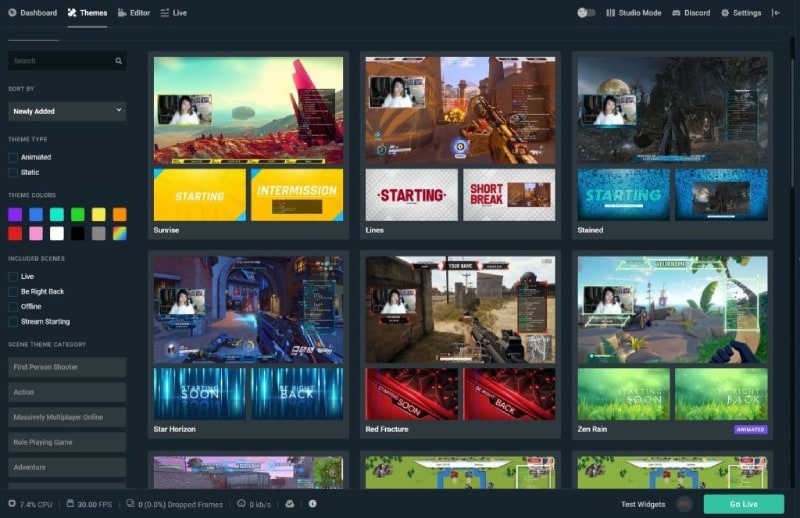
Streamlabs offers a customized version of OBS - Streamlabs OBS. They also provide several items and help to game broadcasters. They bundle several of their products together as Streamlabs Prime, which gives valuable capabilities like multistream, overlays, and sponsorships to help you grow. Over hundreds of themes and overlays are available in Streamlabs Prime. The Streamlabs App Store offers a total of 46 applications. In addition, a vast variety of unique forms and symbols may be utilized to make unique logos as needed from inside the application. Streamlabs overlays serve as a massive marketplace for content creators. Nerd or Die, Visuals by Impulse, and OWN3D are just a few of the artists that have contributed themes to the game.
1. Key features of Streamlabs
With Streamlabs, you don’t have to worry about figuring out which settings to use since the program has an Auto Optimization option that automatically sets the ideal parameters for either streaming or recording. Recording and streaming are the two primary functions of Streamlabs at the moment. The vast majority of users are video game broadcasters and YouTubers. It has a basic, contemporary style and a wide range of useful functions that make it attractive.
Affordability
The Streamlabs Dashboard is a clean and user-friendly interface that includes almost all of the features you’ll need to run a successful streaming operation. Streamlabs provides a Layout Editor if you’d want to customize your user interface to suit your preferences more precisely. It may take some time to get it up and running, but it’s worth the effort to get the most out of it.
Multi-streaming Capability
When you’re just starting as a streamer, one of the easiest ways to expand your following is by broadcasting to many platforms at once. It’s possible to utilize Streamlabs on many platforms at the same time.
Plenty of Overlays
Make yourself look like an expert with Streamlabs! Overlays from some of the best designers in the field are available for free, and you can get hundreds more with Prime.

Enable Alerts
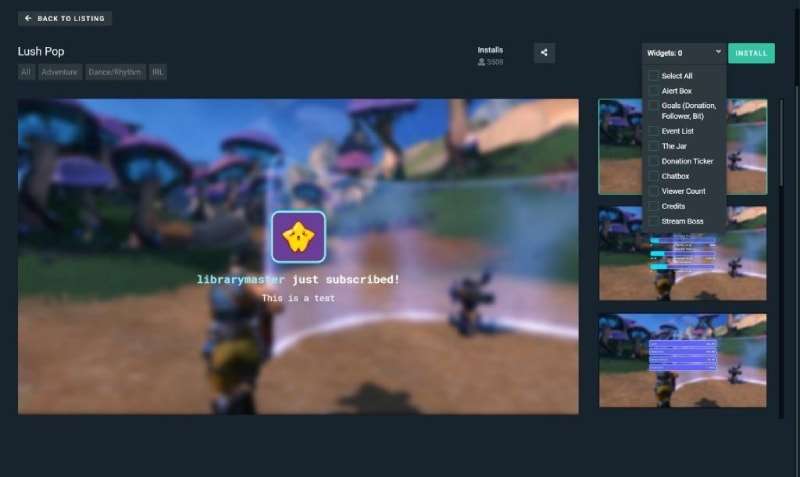
Any stream would be incomplete without alerts. A notification will go up on your screen anytime a new subscriber follows or donates. Here we have another opportunity to brand our channels and accounts. For one thing, it allows for more engagement between the audience and the author.
 SwifDoo PDF Perpetual (2-PC) Free upgrade. No monthly fees ever.
Use of Merch
Because Streamlabs is all about building a brand, they’ve included merchandising options. You’ll create a variety of goods with your design on them, so your fans and viewers may purchase them and help you spread the word about your work.
Lucra Theme
In Streamlabs, Lucra is a unique service that enables content producers to create pay-per-view live streams and sell tickets to their fans. All major streaming software can be readily integrated with it, making it easier to connect with viewers during events.

Use of Donations
There are more opportunities to monetize your broadcast than any other platform on the market thanks to Streamlabs’ special tip page technology, which enables users to begin earning a life via streaming. Tip pages are easy to set up and completely free. When it comes to money, you won’t have to pay Streamlabs OBS any fees.
2. How to Record Video with Streamlabs
It’s good to know that Streamlabs has a few choices to play with if you’re using a graphics card encoder. Try Recording if you don’t require a lot of quality, and if it doesn’t enough, you can always move up to High-Quality Recording. Consider the size of the files before using Indistinguishable or Near-Lossless Recording if you require high-quality recordings. Many of the other settings on the Recording panel have to do with bitrate when you go to Advanced. As part of your recording setup, this is essentially the greater the bitrate, the bigger the file size of the video. To avoid pixelated video, it is best to keep the bitrate at a reasonable level. So beginning with the Streamlabs OBS download for pc, here’s a detailed step-by-step guide for you.
Step 1: Install and Launch Streamlabs OBS
The method of installation is really simple. It’s a one-of-a-kind experience. Streamlabs OBS has to be installed first. Streamlabs OBS pre-configures everything for you and takes you right to your dashboard after you’ve finished the Windows installation.
Step 2: Setup the Recording and Streaming Settings
The next step is to personalize the settings and link your Twitch or YouTube account to the device. By selecting ‘Login’ in the upper right-hand corner of Streamlabs OBS, you may sign in to your Twitch or YouTube account. Run the Auto Optimizer by going to Settings > General.
Step 3: Save or Share Directly
A few clicks and the ‘starting soon’ or ‘facial cam and video game’ scenes are already in place. The next step is to enter your stream key so that Streamlabs OBS may upload your material to the platform for viewing by other subscribers. Click Settings > Stream > and then input your stream key to do this. In the lower right-hand corner, click “Go Live” to begin streaming. If you’re encoding with x264, you’ll have to enter these values by hand. The best bitrate depends on your screen size and set-up, so there isn’t a universal setting that works for everyone. When recording at 60 frames per second in 1080p, you can start with 40,000kbps and adjust as needed.
3. Alternative Way to Record Computer Screen
As mentioned earlier, there’s a difference between OBS and Streamlabs OBS – Streamlabs, such as chat windows and a dashboard, are included. The Streamlabs OBS helps you keep track of your donations and fans. With pre-made themes and templates, it is also easier to incorporate them in a live stream. Non-Streamlabs versions of OBS still support OBS templates, themes, and overlays. But due to its lacking of various features, there’s an alternative to it namely Wondershare Filmora. Both streaming and real-time recording are possible with Filmora screen recorder, which produces HD video quality and is easy to use. Thus, the study explains how to record YouTube videos and how to view them online.
For Win 7 or later (64-bit)
For macOS 10.12 or later
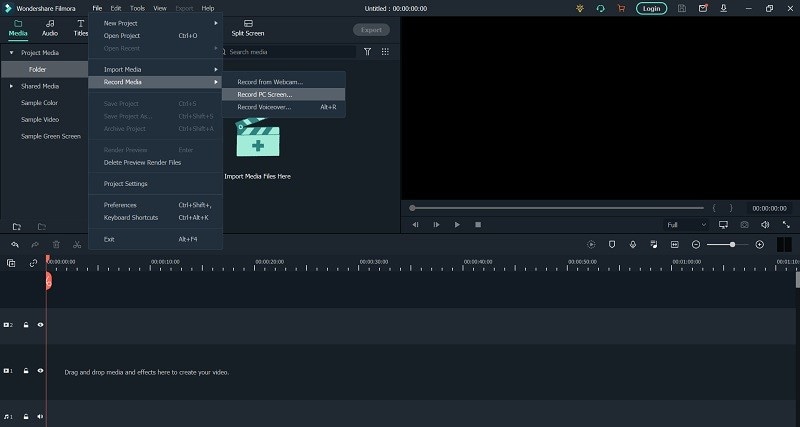
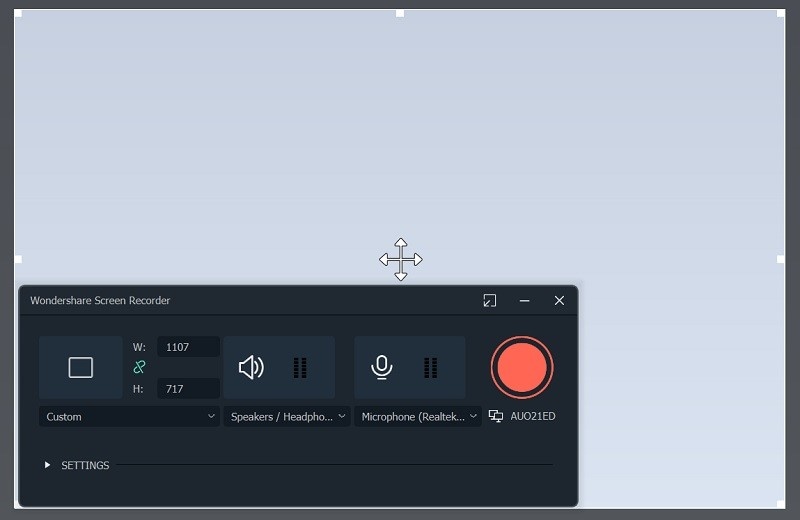
Step 1: Get the Software
As an option, you can record the screen in high-definition (HD). The first step in setting up Wondershare Filmora is to download it from the company’s website and then run the setup file that is downloaded. Once it has been installed, you can run it from your computer. To begin recording, you must click the “Record Mode” menu after the software has been launched. As a result, a new screen will be displayed. In this section, you’ll need to select the area of your computer that you want to record. You can change the recording area’s size by dragging the dotted red color bar, or you can manually enter the screen’s dimensions.
Step 2: Enter the Recording Mode
A camera attached to your computer will automatically be detected and begin recording your activities as soon as you finish the installation. If you want to record part of the screen to use in your tutorial, you can do so in a variety of ways, including by selecting a specific area of the screen to record. Both webcam and screen captures are supported by Filmora. If you prefer, you can take advantage of an external camera. This feature is bolstered by the ability to select your preferred video recording resolution while you are filming.
It’s like when recording video, by default, the system’s audio is recorded, but this can be disabled. The built-in microphone can also be used, as well as an external microphone. For example, in gameplay videos, the audio-visuals of the game are just as important as the player’s reaction to the game. In addition, live streaming and online tutorials have become increasingly popular.
Steps3: Set Audio/Screen Recording Region
You can now quickly and easily record audio for the video that was created with the screenshot using Wondershare Filmora (or the camera recording). An external microphone or the computer’s built-in recording system can be used for this. You can learn how to quickly and easily add your comments to the top of the page by watching the video below.

All of this has to do with video in some way. It is possible to edit, mute, and add music and voiceovers to the soundtrack that contains your recordings at the bottom of the screen.

WPS Office Premium ( File Recovery, Photo Scanning, Convert PDF)–Yearly
Step 4: Editing Your Recorded Video
The idea of putting a small screen above an instructional or video recording and allowing viewers to leave comments is another intriguing one. This is a simple way to record your thoughts about the game or the subject matter you’re currently studying, and it doesn’t require much effort.
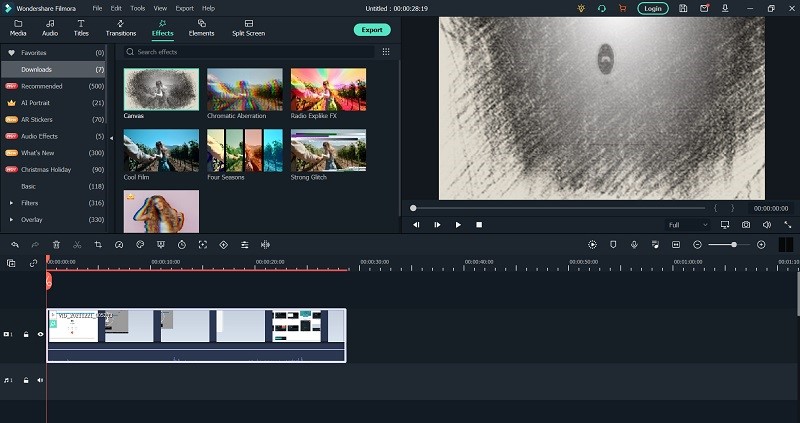
Pushing the button starts the recording process. For your convenience, the video editing menu will be displayed directly on the screen once the recording is complete. It’s easy to use, but it has a lot of potentials. There is a library of available media to choose from while setting up a project on the left (movies, records, music) (for example, audio files). From that screen, you can import any files you need from your computer, cell phone, or any other source.
Step 5: Export Your Masterpiece
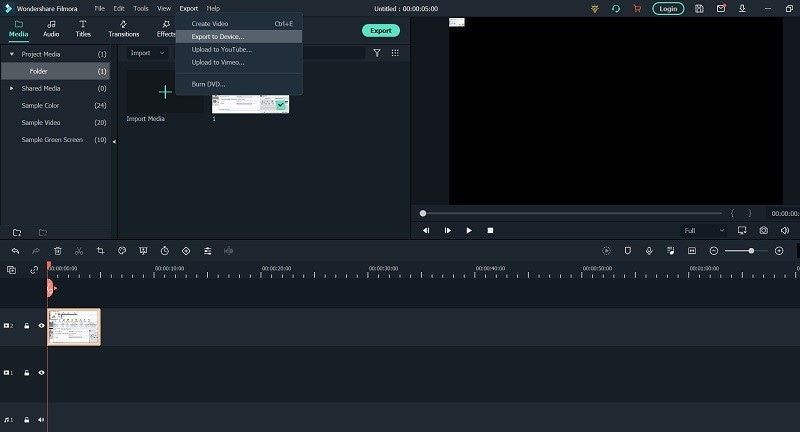
Your screen recordings can now be saved directly to your computer’s hard drive, in whatever format you prefer. Alternatively, you can upload them to YouTube and share them directly with your audience. You must first click on the Export button in the upper right corner of the screen to begin the export process. Simply export the file in the format of your choice (MP4, MOV, AVI, MP3, or GIF), adjust the encoding quality and resolution to your liking, and then distribute it on social media platforms, websites, and other online platforms - Media.
 vMix Pro - Software based live production. vMix Pro includes everything in vMix 4K plus 8 channels of Replay and 8 vMix Call
Conclusion
While using Streamlabs, most of the templates available are nothing more than standard graphics files. You can use them on virtually every major streaming platform, from Twitch to YouTube to Facebook Gaming and everywhere else. You can create your streaming templates if you are a skilled designer and have access to appropriate graphics software, such as Adobe Photoshop or Fireworks. But for that, we have got a recommendation as mentioned earlier – Filmora solution. It’s an all-inclusive software with the best options available as an alternative to Streamlabs.
For macOS 10.12 or later
 vMix Basic HD - Software based live production. vMix Basic HD includes 4 inputs, 3 cameras, streaming, recording, playlist.
Step 1: Get the Software
As an option, you can record the screen in high-definition (HD). The first step in setting up Wondershare Filmora is to download it from the company’s website and then run the setup file that is downloaded. Once it has been installed, you can run it from your computer. To begin recording, you must click the “Record Mode” menu after the software has been launched. As a result, a new screen will be displayed. In this section, you’ll need to select the area of your computer that you want to record. You can change the recording area’s size by dragging the dotted red color bar, or you can manually enter the screen’s dimensions.
Step 2: Enter the Recording Mode
A camera attached to your computer will automatically be detected and begin recording your activities as soon as you finish the installation. If you want to record part of the screen to use in your tutorial, you can do so in a variety of ways, including by selecting a specific area of the screen to record. Both webcam and screen captures are supported by Filmora. If you prefer, you can take advantage of an external camera. This feature is bolstered by the ability to select your preferred video recording resolution while you are filming.
It’s like when recording video, by default, the system’s audio is recorded, but this can be disabled. The built-in microphone can also be used, as well as an external microphone. For example, in gameplay videos, the audio-visuals of the game are just as important as the player’s reaction to the game. In addition, live streaming and online tutorials have become increasingly popular.
Steps3: Set Audio/Screen Recording Region
You can now quickly and easily record audio for the video that was created with the screenshot using Wondershare Filmora (or the camera recording). An external microphone or the computer’s built-in recording system can be used for this. You can learn how to quickly and easily add your comments to the top of the page by watching the video below.
All of this has to do with video in some way. It is possible to edit, mute, and add music and voiceovers to the soundtrack that contains your recordings at the bottom of the screen.
Step 4: Editing Your Recorded Video
The idea of putting a small screen above an instructional or video recording and allowing viewers to leave comments is another intriguing one. This is a simple way to record your thoughts about the game or the subject matter you’re currently studying, and it doesn’t require much effort.
Pushing the button starts the recording process. For your convenience, the video editing menu will be displayed directly on the screen once the recording is complete. It’s easy to use, but it has a lot of potentials. There is a library of available media to choose from while setting up a project on the left (movies, records, music) (for example, audio files). From that screen, you can import any files you need from your computer, cell phone, or any other source.
Step 5: Export Your Masterpiece
Your screen recordings can now be saved directly to your computer’s hard drive, in whatever format you prefer. Alternatively, you can upload them to YouTube and share them directly with your audience. You must first click on the Export button in the upper right corner of the screen to begin the export process. Simply export the file in the format of your choice (MP4, MOV, AVI, MP3, or GIF), adjust the encoding quality and resolution to your liking, and then distribute it on social media platforms, websites, and other online platforms - Media.
Conclusion
While using Streamlabs, most of the templates available are nothing more than standard graphics files. You can use them on virtually every major streaming platform, from Twitch to YouTube to Facebook Gaming and everywhere else. You can create your streaming templates if you are a skilled designer and have access to appropriate graphics software, such as Adobe Photoshop or Fireworks. But for that, we have got a recommendation as mentioned earlier – Filmora solution. It’s an all-inclusive software with the best options available as an alternative to Streamlabs.
For macOS 10.12 or later
Step 1: Get the Software
As an option, you can record the screen in high-definition (HD). The first step in setting up Wondershare Filmora is to download it from the company’s website and then run the setup file that is downloaded. Once it has been installed, you can run it from your computer. To begin recording, you must click the “Record Mode” menu after the software has been launched. As a result, a new screen will be displayed. In this section, you’ll need to select the area of your computer that you want to record. You can change the recording area’s size by dragging the dotted red color bar, or you can manually enter the screen’s dimensions.

Step 2: Enter the Recording Mode
A camera attached to your computer will automatically be detected and begin recording your activities as soon as you finish the installation. If you want to record part of the screen to use in your tutorial, you can do so in a variety of ways, including by selecting a specific area of the screen to record. Both webcam and screen captures are supported by Filmora. If you prefer, you can take advantage of an external camera. This feature is bolstered by the ability to select your preferred video recording resolution while you are filming.

It’s like when recording video, by default, the system’s audio is recorded, but this can be disabled. The built-in microphone can also be used, as well as an external microphone. For example, in gameplay videos, the audio-visuals of the game are just as important as the player’s reaction to the game. In addition, live streaming and online tutorials have become increasingly popular.
Steps3: Set Audio/Screen Recording Region
You can now quickly and easily record audio for the video that was created with the screenshot using Wondershare Filmora (or the camera recording). An external microphone or the computer’s built-in recording system can be used for this. You can learn how to quickly and easily add your comments to the top of the page by watching the video below.
All of this has to do with video in some way. It is possible to edit, mute, and add music and voiceovers to the soundtrack that contains your recordings at the bottom of the screen.
 The BootIt Collection covers multi-booting, partitioning, and disk imaging on traditional PC’s using the standard BIOS and newer PC’s using UEFI. The collection includes BootIt Bare Metal (BIBM) for standard BIOS systems and BootIt UEFI (BIU) for UEFI system.
Step 4: Editing Your Recorded Video
The idea of putting a small screen above an instructional or video recording and allowing viewers to leave comments is another intriguing one. This is a simple way to record your thoughts about the game or the subject matter you’re currently studying, and it doesn’t require much effort.
Pushing the button starts the recording process. For your convenience, the video editing menu will be displayed directly on the screen once the recording is complete. It’s easy to use, but it has a lot of potentials. There is a library of available media to choose from while setting up a project on the left (movies, records, music) (for example, audio files). From that screen, you can import any files you need from your computer, cell phone, or any other source.

Step 5: Export Your Masterpiece
Your screen recordings can now be saved directly to your computer’s hard drive, in whatever format you prefer. Alternatively, you can upload them to YouTube and share them directly with your audience. You must first click on the Export button in the upper right corner of the screen to begin the export process. Simply export the file in the format of your choice (MP4, MOV, AVI, MP3, or GIF), adjust the encoding quality and resolution to your liking, and then distribute it on social media platforms, websites, and other online platforms - Media.
Conclusion
While using Streamlabs, most of the templates available are nothing more than standard graphics files. You can use them on virtually every major streaming platform, from Twitch to YouTube to Facebook Gaming and everywhere else. You can create your streaming templates if you are a skilled designer and have access to appropriate graphics software, such as Adobe Photoshop or Fireworks. But for that, we have got a recommendation as mentioned earlier – Filmora solution. It’s an all-inclusive software with the best options available as an alternative to Streamlabs.
For macOS 10.12 or later
Step 1: Get the Software
As an option, you can record the screen in high-definition (HD). The first step in setting up Wondershare Filmora is to download it from the company’s website and then run the setup file that is downloaded. Once it has been installed, you can run it from your computer. To begin recording, you must click the “Record Mode” menu after the software has been launched. As a result, a new screen will be displayed. In this section, you’ll need to select the area of your computer that you want to record. You can change the recording area’s size by dragging the dotted red color bar, or you can manually enter the screen’s dimensions.
Step 2: Enter the Recording Mode
A camera attached to your computer will automatically be detected and begin recording your activities as soon as you finish the installation. If you want to record part of the screen to use in your tutorial, you can do so in a variety of ways, including by selecting a specific area of the screen to record. Both webcam and screen captures are supported by Filmora. If you prefer, you can take advantage of an external camera. This feature is bolstered by the ability to select your preferred video recording resolution while you are filming.
It’s like when recording video, by default, the system’s audio is recorded, but this can be disabled. The built-in microphone can also be used, as well as an external microphone. For example, in gameplay videos, the audio-visuals of the game are just as important as the player’s reaction to the game. In addition, live streaming and online tutorials have become increasingly popular.
Steps3: Set Audio/Screen Recording Region
You can now quickly and easily record audio for the video that was created with the screenshot using Wondershare Filmora (or the camera recording). An external microphone or the computer’s built-in recording system can be used for this. You can learn how to quickly and easily add your comments to the top of the page by watching the video below.
All of this has to do with video in some way. It is possible to edit, mute, and add music and voiceovers to the soundtrack that contains your recordings at the bottom of the screen.
Step 4: Editing Your Recorded Video
The idea of putting a small screen above an instructional or video recording and allowing viewers to leave comments is another intriguing one. This is a simple way to record your thoughts about the game or the subject matter you’re currently studying, and it doesn’t require much effort.
Pushing the button starts the recording process. For your convenience, the video editing menu will be displayed directly on the screen once the recording is complete. It’s easy to use, but it has a lot of potentials. There is a library of available media to choose from while setting up a project on the left (movies, records, music) (for example, audio files). From that screen, you can import any files you need from your computer, cell phone, or any other source.
Step 5: Export Your Masterpiece
Your screen recordings can now be saved directly to your computer’s hard drive, in whatever format you prefer. Alternatively, you can upload them to YouTube and share them directly with your audience. You must first click on the Export button in the upper right corner of the screen to begin the export process. Simply export the file in the format of your choice (MP4, MOV, AVI, MP3, or GIF), adjust the encoding quality and resolution to your liking, and then distribute it on social media platforms, websites, and other online platforms - Media.
 PearlMountain Image Converter
Conclusion
While using Streamlabs, most of the templates available are nothing more than standard graphics files. You can use them on virtually every major streaming platform, from Twitch to YouTube to Facebook Gaming and everywhere else. You can create your streaming templates if you are a skilled designer and have access to appropriate graphics software, such as Adobe Photoshop or Fireworks. But for that, we have got a recommendation as mentioned earlier – Filmora solution. It’s an all-inclusive software with the best options available as an alternative to Streamlabs.
- Title: In 2024, Innovative Approaches for Effective Use of Streamlabs OBS
- Author: Jane
- Created at : 2024-07-21 01:25:33
- Updated at : 2024-07-22 01:25:33
- Link: https://screen-activity-recording.techidaily.com/in-2024-innovative-approaches-for-effective-use-of-streamlabs-obs/
- License: This work is licensed under CC BY-NC-SA 4.0.