
"2024 Approved Switching File Extensions for Your Mac Snapshots"
Switching File Extensions for Your Mac Snapshots
How to Change Screenshot File Formats on a Mac


Max Wales
Mar 27, 2024• Proven solutions
Taking screenshots on a Mac computer is a straightforward process that requires you to just hold Command + Shift + 3 or 4 keys. That’s it, the file is then saved on your desktop by default, and you can open it in a photo editing software where you can change its file format, crop it or enhance its colors. Mac computers, save screenshots as PNG files, but they also offer support for JPEG, PDF, TIFF, and GIF files, so its users can select the one that best suits their needs.
However, the process of changing the default screenshot file format on a Mac is needlessly complicated, but in this article, we will show you how you can accomplish this task in just a few simple steps.

![]()

The All-in-One Screen Recorder & Video Editor
- Record desktop screen, voiceover, and webcam simultaneously
- Edit recorded clips quickly with a wide range of professional tools
- Built-in plentiful templates and effects
- Export to MP4, MOV, MKV, GIF and multiple formats
For Win 7 or later (64-bit)
For macOS 10.12 or later
 Secure Download

Supported Image Formats on Mac
As we already mentioned, Mac computers allow its users to save screenshots in some of the most frequently used picture file formats. The PNG files support lossless data compression, just like GIF files and they are the most commonly used lossless data compression format on the Internet. However, there are a few downsides, including the size of the PNG files that can prompt you to set another file format as the default screenshot file format on your Mac.
Using JPEG file extension will enable you to create images that can be used in Word documents, PowerPoint presentations or shared anywhere on the Internet. PDF or TIFF files should only be used if you want to print the screenshot you’ve taken, while the GIF file format is used to create short animations or loops and there is absolutely no reason to use it as a default screenshot file format.
Which Screenshot Format Should You Use?
Each image file format Mac computer support is designed for different purposes, which is the reason why you should choose the screenshot graphics format that best fits the context in which the file is going to be used. Converting PNG files to some popular file format is almost always necessary, so if you want to avoid having to go through the file conversion process every time you take a screenshot just to be able to edit it, our advice is to set the JPEG as the default screenshot file format on your Mac.
Besides being smaller in size than PNG files, JPEG files are also handier if you want to annotate the screenshots you’re taking. In addition, you’ll be able to post your files anywhere on the Internet, because JPEG files are supported by all social media platforms.
How to Change Screenshot Formats?
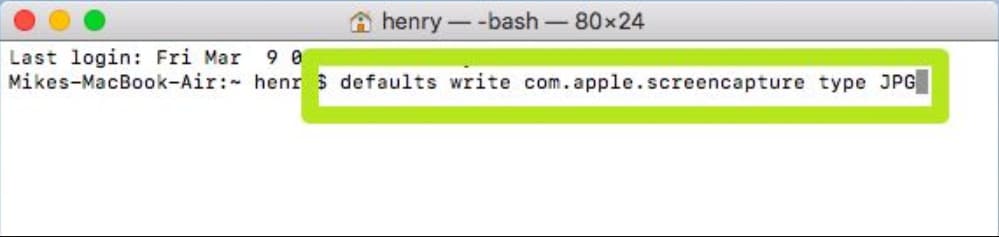
Once you decide which format you want to use the default screenshot graphics format on your Mac, you should launch the Terminal app. You can access the Terminal from the Utility subfolder that is located in the Application folder.
When the Terminal window appears on the screen you will have to insert the following command:
defaults write com.apple.screencapture type jpg
As you can see, the command ends with .jpg, which is, in this case, the default graphics format to which you will be switching to. The command line is the same for all other file formats, and the only difference is the file extension at the end.
Press the Return or Enter button to execute the command and then proceeded to confirm the changes you’ve made by resetting the UI and entering this command line:
killall SystemUIServer
Press the Enter key, to complete the process and enjoy taking screenshots in the JPEG file format. This step is necessary for changing all other graphics formats supported by Mac computers, and the command line is always the same.
Here’s how you can change the screenshot file format to TIFF, GIF, PDF or PNG. Simply insert the appropriate command line and make sure to restart Mac’s UI by entering the killall SystemUIServer command after you change the graphics format.
The Command line for changing the Screenshot format to TIFF:
defaults write com.apple.screencapture type TIFF
PDF:
defaults write com.apple.screencapture type PDF
GIF:
defaults write com.apple.screencapture type GIF
PNG:
defaults write com.apple.screencapture type PNG
You can switch back to capturing screenshots in PNG file format at any moment by simply following the steps we described for all other image file formats supported by the macOS. Leave a comment and let us know which file format you like to use the most as the default screenshot format on your Mac.
Max Wales
Max Wales is a writer and a lover of all things video.
Follow @Max Wales
Max Wales
Mar 27, 2024• Proven solutions
Taking screenshots on a Mac computer is a straightforward process that requires you to just hold Command + Shift + 3 or 4 keys. That’s it, the file is then saved on your desktop by default, and you can open it in a photo editing software where you can change its file format, crop it or enhance its colors. Mac computers, save screenshots as PNG files, but they also offer support for JPEG, PDF, TIFF, and GIF files, so its users can select the one that best suits their needs.
However, the process of changing the default screenshot file format on a Mac is needlessly complicated, but in this article, we will show you how you can accomplish this task in just a few simple steps.
![]()
The All-in-One Screen Recorder & Video Editor
- Record desktop screen, voiceover, and webcam simultaneously
- Edit recorded clips quickly with a wide range of professional tools
- Built-in plentiful templates and effects
- Export to MP4, MOV, MKV, GIF and multiple formats
For Win 7 or later (64-bit)
For macOS 10.12 or later

Secure Download
 SwifDoo PDF Perpetual (2-PC) Free upgrade. No monthly fees ever.
Supported Image Formats on Mac
As we already mentioned, Mac computers allow its users to save screenshots in some of the most frequently used picture file formats. The PNG files support lossless data compression, just like GIF files and they are the most commonly used lossless data compression format on the Internet. However, there are a few downsides, including the size of the PNG files that can prompt you to set another file format as the default screenshot file format on your Mac.
Using JPEG file extension will enable you to create images that can be used in Word documents, PowerPoint presentations or shared anywhere on the Internet. PDF or TIFF files should only be used if you want to print the screenshot you’ve taken, while the GIF file format is used to create short animations or loops and there is absolutely no reason to use it as a default screenshot file format.
Which Screenshot Format Should You Use?
Each image file format Mac computer support is designed for different purposes, which is the reason why you should choose the screenshot graphics format that best fits the context in which the file is going to be used. Converting PNG files to some popular file format is almost always necessary, so if you want to avoid having to go through the file conversion process every time you take a screenshot just to be able to edit it, our advice is to set the JPEG as the default screenshot file format on your Mac.
Besides being smaller in size than PNG files, JPEG files are also handier if you want to annotate the screenshots you’re taking. In addition, you’ll be able to post your files anywhere on the Internet, because JPEG files are supported by all social media platforms.
 ZoneAlarm Pro Antivirus + Firewall NextGen
How to Change Screenshot Formats?
Once you decide which format you want to use the default screenshot graphics format on your Mac, you should launch the Terminal app. You can access the Terminal from the Utility subfolder that is located in the Application folder.
When the Terminal window appears on the screen you will have to insert the following command:
defaults write com.apple.screencapture type jpg
As you can see, the command ends with .jpg, which is, in this case, the default graphics format to which you will be switching to. The command line is the same for all other file formats, and the only difference is the file extension at the end.
Press the Return or Enter button to execute the command and then proceeded to confirm the changes you’ve made by resetting the UI and entering this command line:
killall SystemUIServer
Press the Enter key, to complete the process and enjoy taking screenshots in the JPEG file format. This step is necessary for changing all other graphics formats supported by Mac computers, and the command line is always the same.
Here’s how you can change the screenshot file format to TIFF, GIF, PDF or PNG. Simply insert the appropriate command line and make sure to restart Mac’s UI by entering the killall SystemUIServer command after you change the graphics format.
The Command line for changing the Screenshot format to TIFF:
defaults write com.apple.screencapture type TIFF
PDF:
defaults write com.apple.screencapture type PDF
GIF:
defaults write com.apple.screencapture type GIF
PNG:
defaults write com.apple.screencapture type PNG
You can switch back to capturing screenshots in PNG file format at any moment by simply following the steps we described for all other image file formats supported by the macOS. Leave a comment and let us know which file format you like to use the most as the default screenshot format on your Mac.
Max Wales
Max Wales is a writer and a lover of all things video.
Follow @Max Wales
Max Wales
Mar 27, 2024• Proven solutions
Taking screenshots on a Mac computer is a straightforward process that requires you to just hold Command + Shift + 3 or 4 keys. That’s it, the file is then saved on your desktop by default, and you can open it in a photo editing software where you can change its file format, crop it or enhance its colors. Mac computers, save screenshots as PNG files, but they also offer support for JPEG, PDF, TIFF, and GIF files, so its users can select the one that best suits their needs.
However, the process of changing the default screenshot file format on a Mac is needlessly complicated, but in this article, we will show you how you can accomplish this task in just a few simple steps.
![]()
The All-in-One Screen Recorder & Video Editor
- Record desktop screen, voiceover, and webcam simultaneously
- Edit recorded clips quickly with a wide range of professional tools
- Built-in plentiful templates and effects
- Export to MP4, MOV, MKV, GIF and multiple formats
For Win 7 or later (64-bit)
For macOS 10.12 or later
Secure Download
Supported Image Formats on Mac
As we already mentioned, Mac computers allow its users to save screenshots in some of the most frequently used picture file formats. The PNG files support lossless data compression, just like GIF files and they are the most commonly used lossless data compression format on the Internet. However, there are a few downsides, including the size of the PNG files that can prompt you to set another file format as the default screenshot file format on your Mac.
Using JPEG file extension will enable you to create images that can be used in Word documents, PowerPoint presentations or shared anywhere on the Internet. PDF or TIFF files should only be used if you want to print the screenshot you’ve taken, while the GIF file format is used to create short animations or loops and there is absolutely no reason to use it as a default screenshot file format.
Which Screenshot Format Should You Use?
Each image file format Mac computer support is designed for different purposes, which is the reason why you should choose the screenshot graphics format that best fits the context in which the file is going to be used. Converting PNG files to some popular file format is almost always necessary, so if you want to avoid having to go through the file conversion process every time you take a screenshot just to be able to edit it, our advice is to set the JPEG as the default screenshot file format on your Mac.
Besides being smaller in size than PNG files, JPEG files are also handier if you want to annotate the screenshots you’re taking. In addition, you’ll be able to post your files anywhere on the Internet, because JPEG files are supported by all social media platforms.

How to Change Screenshot Formats?
Once you decide which format you want to use the default screenshot graphics format on your Mac, you should launch the Terminal app. You can access the Terminal from the Utility subfolder that is located in the Application folder.
When the Terminal window appears on the screen you will have to insert the following command:
defaults write com.apple.screencapture type jpg
As you can see, the command ends with .jpg, which is, in this case, the default graphics format to which you will be switching to. The command line is the same for all other file formats, and the only difference is the file extension at the end.
Press the Return or Enter button to execute the command and then proceeded to confirm the changes you’ve made by resetting the UI and entering this command line:
killall SystemUIServer
Press the Enter key, to complete the process and enjoy taking screenshots in the JPEG file format. This step is necessary for changing all other graphics formats supported by Mac computers, and the command line is always the same.
Here’s how you can change the screenshot file format to TIFF, GIF, PDF or PNG. Simply insert the appropriate command line and make sure to restart Mac’s UI by entering the killall SystemUIServer command after you change the graphics format.
The Command line for changing the Screenshot format to TIFF:
defaults write com.apple.screencapture type TIFF
PDF:
defaults write com.apple.screencapture type PDF
GIF:
defaults write com.apple.screencapture type GIF
PNG:
defaults write com.apple.screencapture type PNG
You can switch back to capturing screenshots in PNG file format at any moment by simply following the steps we described for all other image file formats supported by the macOS. Leave a comment and let us know which file format you like to use the most as the default screenshot format on your Mac.
Max Wales
Max Wales is a writer and a lover of all things video.
Follow @Max Wales
Max Wales
Mar 27, 2024• Proven solutions
Taking screenshots on a Mac computer is a straightforward process that requires you to just hold Command + Shift + 3 or 4 keys. That’s it, the file is then saved on your desktop by default, and you can open it in a photo editing software where you can change its file format, crop it or enhance its colors. Mac computers, save screenshots as PNG files, but they also offer support for JPEG, PDF, TIFF, and GIF files, so its users can select the one that best suits their needs.
However, the process of changing the default screenshot file format on a Mac is needlessly complicated, but in this article, we will show you how you can accomplish this task in just a few simple steps.
![]()

The All-in-One Screen Recorder & Video Editor
- Record desktop screen, voiceover, and webcam simultaneously
- Edit recorded clips quickly with a wide range of professional tools
- Built-in plentiful templates and effects
- Export to MP4, MOV, MKV, GIF and multiple formats
For Win 7 or later (64-bit)
For macOS 10.12 or later
Secure Download
Supported Image Formats on Mac
As we already mentioned, Mac computers allow its users to save screenshots in some of the most frequently used picture file formats. The PNG files support lossless data compression, just like GIF files and they are the most commonly used lossless data compression format on the Internet. However, there are a few downsides, including the size of the PNG files that can prompt you to set another file format as the default screenshot file format on your Mac.
Using JPEG file extension will enable you to create images that can be used in Word documents, PowerPoint presentations or shared anywhere on the Internet. PDF or TIFF files should only be used if you want to print the screenshot you’ve taken, while the GIF file format is used to create short animations or loops and there is absolutely no reason to use it as a default screenshot file format.
Which Screenshot Format Should You Use?
Each image file format Mac computer support is designed for different purposes, which is the reason why you should choose the screenshot graphics format that best fits the context in which the file is going to be used. Converting PNG files to some popular file format is almost always necessary, so if you want to avoid having to go through the file conversion process every time you take a screenshot just to be able to edit it, our advice is to set the JPEG as the default screenshot file format on your Mac.
Besides being smaller in size than PNG files, JPEG files are also handier if you want to annotate the screenshots you’re taking. In addition, you’ll be able to post your files anywhere on the Internet, because JPEG files are supported by all social media platforms.
How to Change Screenshot Formats?
Once you decide which format you want to use the default screenshot graphics format on your Mac, you should launch the Terminal app. You can access the Terminal from the Utility subfolder that is located in the Application folder.
When the Terminal window appears on the screen you will have to insert the following command:
defaults write com.apple.screencapture type jpg
As you can see, the command ends with .jpg, which is, in this case, the default graphics format to which you will be switching to. The command line is the same for all other file formats, and the only difference is the file extension at the end.
Press the Return or Enter button to execute the command and then proceeded to confirm the changes you’ve made by resetting the UI and entering this command line:
killall SystemUIServer
Press the Enter key, to complete the process and enjoy taking screenshots in the JPEG file format. This step is necessary for changing all other graphics formats supported by Mac computers, and the command line is always the same.
Here’s how you can change the screenshot file format to TIFF, GIF, PDF or PNG. Simply insert the appropriate command line and make sure to restart Mac’s UI by entering the killall SystemUIServer command after you change the graphics format.
The Command line for changing the Screenshot format to TIFF:
defaults write com.apple.screencapture type TIFF
PDF:
defaults write com.apple.screencapture type PDF
GIF:
defaults write com.apple.screencapture type GIF
PNG:
defaults write com.apple.screencapture type PNG
You can switch back to capturing screenshots in PNG file format at any moment by simply following the steps we described for all other image file formats supported by the macOS. Leave a comment and let us know which file format you like to use the most as the default screenshot format on your Mac.
Max Wales
Max Wales is a writer and a lover of all things video.
Follow @Max Wales
- Title: 2024 Approved Switching File Extensions for Your Mac Snapshots
- Author: Jane
- Created at : 2024-07-21 02:04:51
- Updated at : 2024-07-22 02:04:51
- Link: https://screen-activity-recording.techidaily.com/2024-approved-switching-file-extensions-for-your-mac-snapshots/
- License: This work is licensed under CC BY-NC-SA 4.0.